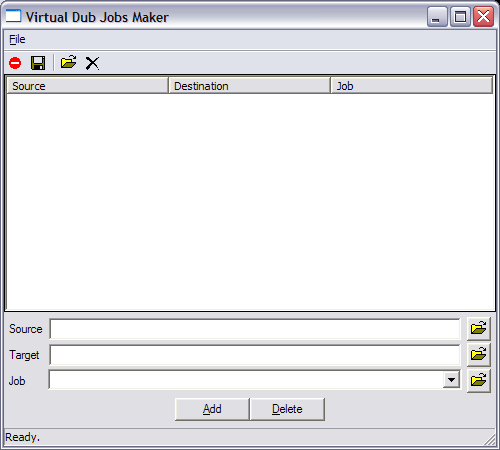
VDBatch – Virtual Dub Job Maker
You may know Virtual Dub, this excellent video software (work with all 1.4 versions)
You may also have numerous video files badly encoded, that you wish to re-encode with better coded settings (probably in two-pass). But this is rather a long work…
VDBatch allows you to create automatically a job list containing all these re-encodings, with a simple drag’n drop interface. Once the codec settings recorded, the use is very simple.
Download binaries for windows (win32 only)
Download the python script (all platforms with a python interpreter, and wxPython)
How to use
Lauch the program
Windows : unzip the file, and launch vdbatch.exe
Other OS (but VirtualDub only works under Windows…) : unzip the source file, and run the python script : ./vdbatch.py
How to use
The simpliest way is to drag’n drop from explorer the files you want to reencode. You can after adjust the file settings, as the output file name, and the job setting to use (select the one you want in the dropdown).
When you are ready, save the job list. Open Virtual Dub, and open the Job Control (File / Job Control…). Load the file you have juste created (File / Load Job List…), and run the whole thing, that is all !
Configure a new job
Create a new kin of job needs some work :
- Use Virtual Dub to create the base file :
- Open Virtual Dub, with a file, and select all the settings you want (codec, conversions, filters,…)
- Save the file and check the box “Dont run this job now ; add it to job control so I can run it in batch mode”.
- If you have selected a two-pass codec, redo the previous step with the second pass.
- Then, open the Job Control (File / Job Control…). You should see all your files.
- Save this file. (File / Save Job List)
- Edit this joblist to get a valid job template usable with VDBatch
- VDBatch works with tags (typically, %INPUTFILE% will be replaced by the file you selected)
- Suppress headings and footers : it is everything above the first
// $joband under the last// $endjob - Replace then explicit references to your file’s names by the appropriate tags :
- %JOBNAME% : Name of the job, typically
// $job "%JOBNAME - 1st". - %INPUTFILE% : Name of the source file, typically
// $input "%INPUTFILE%" - %OUTPUTFILE% : Name of the target file, typically
// $output "%OUTPUTFILE%" - %INPUTFILE_SLASH% : Name of the source file, with double slash, typically
VirtualDub.Open("%INPUTFILE_SLASH%",0,0); - %OUTPUTFILE_SLASH% : Name of the target file, with double slash, typically
VirtualDub.SaveAVI("%OUTPUTFILE_SLASH%");
- %JOBNAME% : Name of the job, typically
- Rename the file with the extension .job, and copy it into the jobs/ folder, to see it in the job’s dropdown list.
- Do not hesitate to imitate the provided examples in the jobs/ directory.
There is other ways to perform these operation, maybe faster. By example, you can copy the whole contents of the vcf’s files (VirtualDub’s configuration files, obtained by File / Save Processing Settings…) between the lines VirtualDub.Open(…) and VirtualDub.SaveAVI(…) of an existing .job file.
News
The version 0.2 is released. New functionnalities are the possibility to configure everything by the config.xml file, and to select in the GUI the default jobfile for all added files.

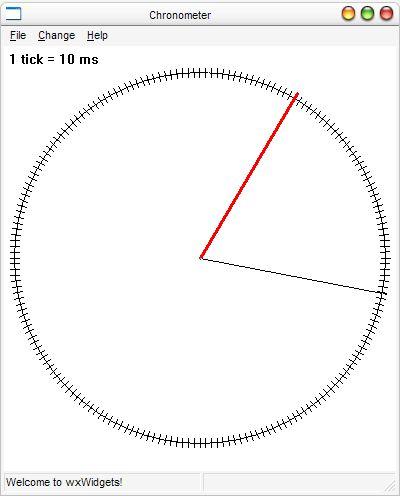
Digital Camera Chronometer
Chronometer was developped to have an idea of the speed of a digital camera. To measure this time with Chronometer, you only have to press [space] at the same time you press the camera shutter.
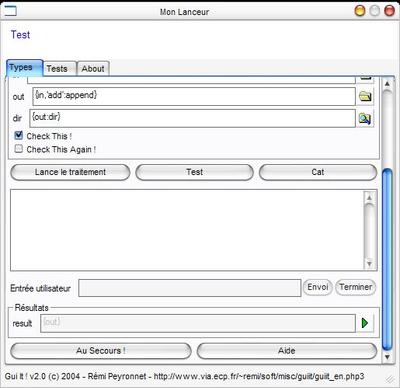
Gui It ! The GUI for your command lines
GUI It ! aims at providing an easy solution for building front end GUI for command line tools.

Gui It ! L’IHM de vos lignes de commande
L’objectifs de Gui It ! est de permettre la création rapide d’interface graphique pour les outils en ligne de commande.
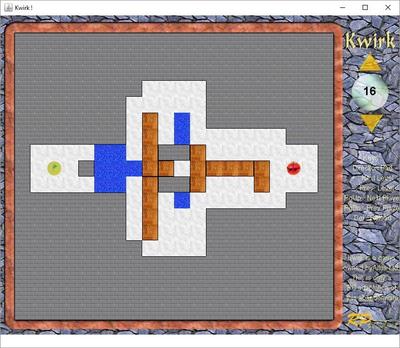
Kwirk
This game is an adaptation of the old GameBoy game. This game is the property of Altus Ltd, but seems to be abandonned. The goal is to get the hero(s) reaching the exit, avoiding obstacles, gaps, blocks or swivels.