Xiaomi Smart Scale with Domoticz, NodeRed, Raspberry and Google Fit
I recently bought the cheap Xiaomi Mi Body Composition Scale 2 that is often sold at 20/25€ on sale, which is quite a deal for a Bluetooth smart scale. The scale works pretty well but has two major drawbacks for me that we will solve with Domoticz, NodeRed, and Raspberry.
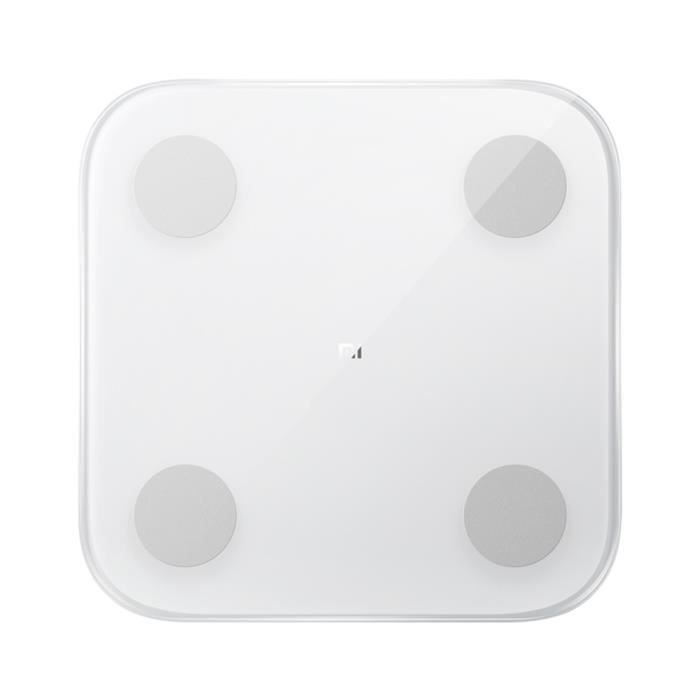
The scale has a great look, very clean, all in white, with no visible panel and no buttons on the top. The digits will display your weight in white light when used. The application “Mi Fit” is great, and will display the other metrics (fat, water, IMC, bones weight, metabolic age,…) based on the measurements and the data you provide to the application. It will also store your historic data and display all that in a clean user interface.
You may be concerned about giving health information to a cloud provider and to Xiaomi. If you are only concerned by that, there is an open-source application called openScale (available for free on F-Droid, or paid on Google Play for Bluetooth version).
You may also be concerned about not being able to retrieve your data. I have not seen any export with Mi Fit application, but you can bind Mi Fit with Google Fit so your weight (and only the weight) will be stored also in Google Fit and will be available through Google Takeout. This is obviously not an option if you are concerned with a cloud to have your data.
But what really decided me to find another solution is that you must absolutely use the application when using the scale to get and store the data. If you simply use the scale without the application simultaneously opened on your phone, your measures will simply not be stored. And for day-to-day use, this is really not convenient! So I wanted to find a way to get the data without my phone, and to connect it to my home automation to log and view data.
Bluetooth LE & antenna
The smart scale uses Bluetooth Low Energy (BLE). You will need a compatible device to be able to connect. I bought this one, very cheap but effective, and works on Linux.
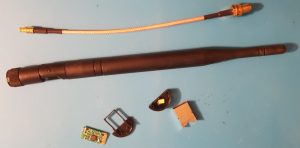
Also as stated in the name… it is Low Energy, and so the emitting range is not very good. Even if the protocol shows a range up to 400 meters, in my case, with that scale, I was not able to go beyond 1-2 meters, maybe because of some concrete walls, and that is a big problem. You will see some posts about extending Bluetooth range, for instance in this good instructables article.
 →
→ 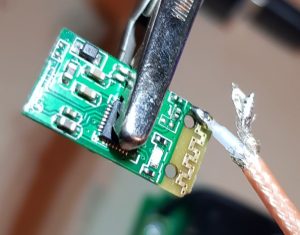
But it only doubled the range, which is great, but was not enough in my case. I guess that if I have done the same for the smart scale antenna it would have worked, but I was not too keen to open and modify the scale, and it certainly has not enough room to store a decent antenna. There is also Bluetooth range extended, but even if adding something, then add something cool 🙂 So I decided to test a Raspberry Zero W and add it as Bluetooth to the Wifi gateway. There are a lot of other options, notably with ESP32 but my attempt with ESP-CAM was not successful.
Raspberry Gateway
This was my first Raspberry Zero W, and I must say that I am impressed with all the cleverness and versatility of the device for only 11€. Some examples:
- I have not noticed that the HDMI connector was “mini HDMI” and not “micro HDMI”, and I have no mini HDMI cable. No problem, the raspberry can be fully configured headless!
- I have also bought the incredibly cheap Raspberry Zero 1.3 (less than 5€ for a real computer…). But no built-in networking is not very handy to install packages. No problem, you can set up that when plugged into USB, it will be detected by your PC as a USB network card and bridge your internet connection to the Raspberry. So useful! (alternate article with Linux, MacOS and Windows)
- You may also be concerned about the tiny antenna and think it would have been better to have an onboard connector. By looking closely, pads are here for you to be able to solder one! But it will require micro-soldering skills, and the onboard antenna is very good and turned to be enough for me.
I will not go through the process of the Raspberry initial setup; it is very straightforward with Raspberry Pi Imager and the links above.
Once up and configured, we will use a good piece of software xiaomi_mi_scale that will listen to the Bluetooth interface, calculate all the data as would have done the Mi Fit application, and send the results on MQTT.
sudo apt install git
git clone https://github.com/lolouk44/xiaomi_mi_scale
Then we will install the needed dependencies (you may also need glib2.0 / libglib2.0-dev if problems occur when installing requirements with pip)
cd src
# sudo apt install glib2.0 libglib2.0-dev  # uncomment this if problems occur when installing requirements with pip
sudo pip3 install -r requirements.txt
And enter our configuration in src/wrapper.sh
nano wrapper.sh
Enter the MAC address of your scale (you can get it from Mi Fit application as described on the GitHub page), your personal details to have accurate data, and the information to connect to your MQTT server. If your server does not require authentication, you must comment user/password field (and not just leave them empty).
I suggest that you first try to run the script manually, to see if anything is wrong. To access Bluetooth, it will require to be run by the root user. On a normal PC you would certainly bother to run as a normal user and give permissions to this user, but if the raspberry does not run anything critical, running with root will be the simplest.
./wrapper.sh
The script takes more than 60 s to start (a sleep 60 for the purpose to wait for connection when run at boot). You can then try your scale, and after stabilization and some delay, you should see a message. You may watch also your MQTT server with the command below (if not run on the MQTT server machine, you should provide additional information)
mosquitto_sub -t "miscale/#" -v
You should see something like below (with numbers instead of ** 🙂 )
miscale/Remi/weight {"weight":**.**,"weight_unit":"kg","bmi":**.**,"basal_metabolism":**.**,"visceral_fat":**.**,"lean_body_mass":**.**,"body_fat":**.**,"water":**.**,"bone_mass":**.**,"muscle_mass":**.**,"protein":**.**,"body_type":"****","metabolic_age":**,"timestamp":"2021-02-13 12:16:39.310744"}
If everything works OK, you may now start the script at boot time, by adding a line to crontab. It must be the root crontab (to be run with root permission), so edit cron with sudo cron -e and add the following line :
@reboot bash /path/to/wrapper.sh
The Raspberry part is now OK, you may reboot it.
The above script requires python 3.6, and that should be OK for most of the devices, But if you have chosen an old alternative device, like Orange Pi Zero, it has only python 3.5. Here is a fork to run the script with a version of python3 older than 3.6: https://github.com/rpeyron/xiaomi_mi_scale
Domoticz setup
The setup on Domoticz side is fairly simple and consists of creating some virtual sensors with the “dummy” hardware.
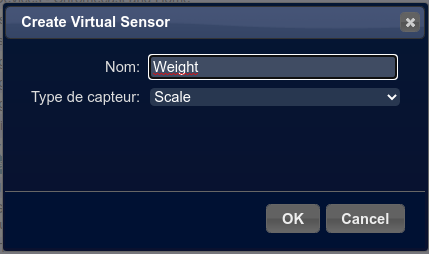
I decided to create 4 virtual sensors to get the MiScale data:
- 1 of type “Scale”, to store the weight. For some reason, I have an issue with the logging function (which seems to have been fixed) so I decided to create the one below
- 1 of type “Custom Sensor”, to store also the weight (logging function is working OK)
- 1 of type “Custom Sensor”, to store metabolic age
- 1 of type “Percentage”, to store fat percentage
You can create several others to store all values provided by the smart scale, I choose only three of them that make sense to me.
In my case, I decided to update the values through MQTT, with the MQTT client hardware bundled in Domoticz and a mosquito MQTT server on my Linux box. It is also possible to code a python plugin or specific hardware in Domoticz code, but integration with MQTT was the easiest in my opinion. To test if the update is working correctly, and be sure to have the right MQTT syntax you can try to inject some values with the command line :
mosquitto_pub -t "domoticz/in" -m '{"idx": 283, "nvalue": 0, "svalue": "62.52#35" }'
Where idx is the index of the device to update. For some unknown reason, the weight must be provided in the svalue field and not in nvalue field. You can also provide extra data with ‘#’ but they won’t be used. With the command above your virtual sensor should now read 62.52. If not, there is some issue either in your MQTT configuration or with the device index you use.
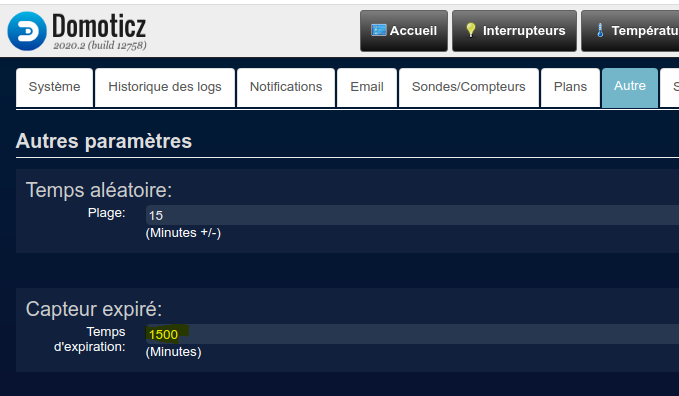
If you don’t want your device to appear always in red because of the timeout, you may also configure in the Setup the Timeout value to 1500 mn, that is 25h, more than a day, which should be fine if you weigh yourself daily.
Node-Red installation and configuration
We now have on one side our Raspberry publishing MQTT miscale messages, and on the other side Domoticz listening to domoticz/in messages. And we have to wire the two together, with the appropriate format transformation. Here comes Node-Red which is an automation tool like IFTTT, Zapier, Microsoft Flow, Tasker, or many others. Node-Red is self-hosted free software, comes with a great GUI to set up your flows, and have a large community sharing all sort of predefined connectors and flows.
It has many installation possibilities and can be deployed on the raspberry. I choose to deploy it on my Linux box to be hosted at the same place as Domoticz, the MQTT server,… The installation is pretty forward following the instructions on the Node-Red website and with the help of npm:
sudo npm install -g --unsafe-perm node-red
You should define a user not to run Node-Red with root permission:
adduser nodered
And install a startup script to start automatically Node-Red, that you can customize as below (customized from the raspberry installer) :
/etc/systemd/system/Node-Red.service
# systemd service file to start Node-RED

[Unit]
Description=Node-RED graphical event wiring tool
Wants=network.target
Documentation=http://nodered.org/docs/hardware/raspberrypi.html

[Service]
Type=simple
# Run as normal pi user - change to the user name you wish to run Node-RED as
User=nodered
Group=nodered
WorkingDirectory=/home/nodered

Environment="NODE_OPTIONS=--max_old_space_size=512"
# uncomment and edit next line if you need an http proxy
#Environment="HTTP_PROXY=my.httpproxy.server.address"
# uncomment the next line for a more verbose log output
#Environment="NODE_RED_OPTIONS=-v"
# uncomment next line if you need to wait for time sync before starting
#ExecStartPre=/bin/bash -c '/bin/journalctl -b -u systemd-timesyncd | /bin/grep -q "systemd-timesyncd.* Synchronized to time server"'

ExecStart=/usr/bin/env node-red-pi $NODE_OPTIONS $NODE_RED_OPTIONS
#ExecStart=/usr/bin/env node $NODE_OPTIONS red.js $NODE_RED_OPTIONS
# Use SIGINT to stop
KillSignal=SIGINT
# Auto restart on crash
Restart=on-failure
RestartSec=20
# Tag things in the log
SyslogIdentifier=Node-RED
#StandardOutput=syslog

[Install]
WantedBy=multi-user.target
To enable the script to be run at startup:
systemctl enable Node-Red
And to start it right now without rebooting:
service Node-Red start
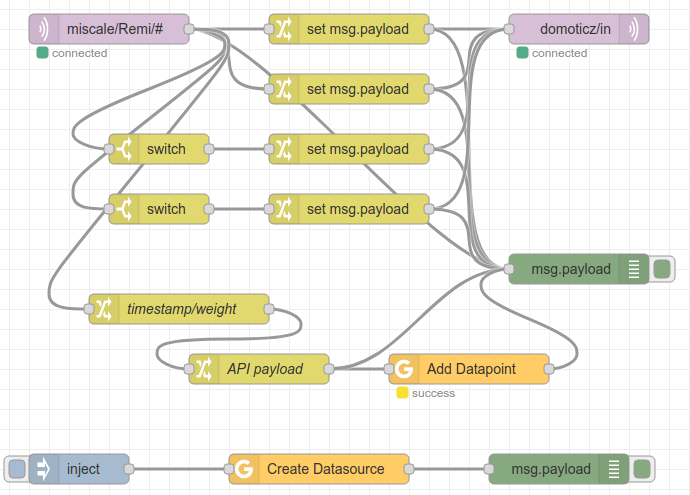
You should now be able to connect to http://localhost:1880/ and be able to configure your first flow. What we want is basically to listen on one side to the miscale MQTT events, transform each message to submit the right value for each of the four of our Domoticz virtual sensors. We must also take care that all values are not always present, like metabolic age or fat value. Here is the resulting flow:
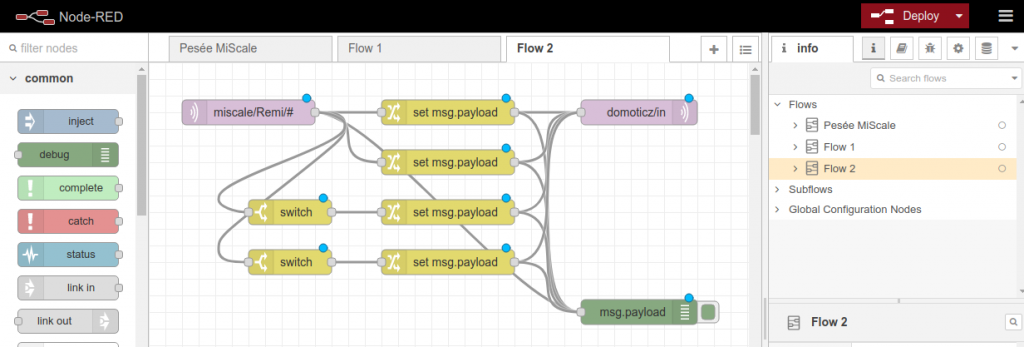
The principle of Node-Red is fairly simple. You have on the left side a collection of available nodes that are able to receive, process, and send data. You drag and drop the ones you need, connect the right side of the sender to the left side of the receiver, and double click on each of them to configure the node. We will use:
- Two MQTT nodes, one for the input, and one for the output. For each of them, you will need to configure the MQTT connection and the topic to listen or to publish.
- Four “change” nodes, that will convert the input in the format needed by Domoticz. For that we will use JSONata, which is a very convenient way to convert an input JSON structure into another output JSON structure with the ability to use some data management functions (see screenshots below)
- Two “switch” nodes to check if the required data is present
- One debug node (the green one at the bottom right) to be able to see the messages in the debug window. When everything is working, you can remove it or deactivate it by clicking on the box on the right.
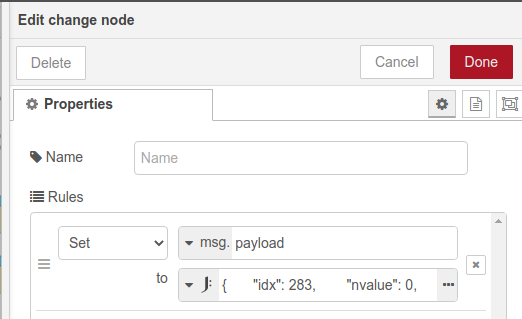
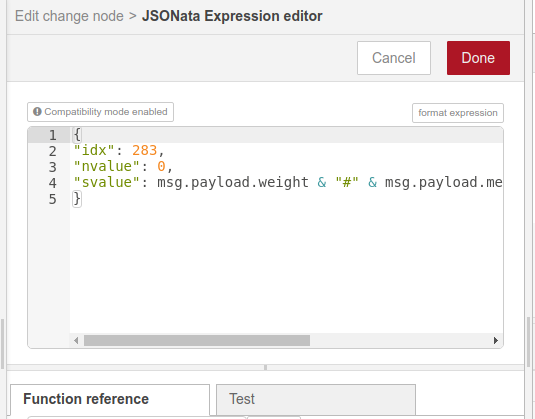
For example for a “change” node, you will double click the first time to have the “Edit change node” below, and select Set action, on msg.payload, with JSONata (the “J:” icon). You then will be able to click on the “…” on the right of the “J:” field to open another window to edit the JSONata expression. JSONata is quite self-explaining, you define the output JSON structure you want, and you can use in it either literal values, values of input objects, or use functions. At the bottom of the screen, you have the function reference and the ability to test your expression. If the expression use input data, you will need to provide a sample input structure. You can have a look at the JSONata reference documentation
Here is the full flow definition that you can import in your Node-Red with the import submenu on the top right menu (open the text file in the zip file and copy the contents in the import zone), but you will need to modify it to your own configuration for it to be useful.
You will need to click on the red “Deploy” button on the top right to run your flow. You can then inject some test data in your MQTT server with:
mosquitto_pub -t "miscale/Remi/weight" -m '{"weight":62.30,"weight_unit":"kg","bmi":52.82,"basal_metabolism":759.72,"visceral_fat":5.69,"lean_body_mass":57.45,"body_fat":21.64,"water":53.75,"bone_mass":2.88,"muscle_mass":53.77,"protein":20.62,"body_type":"Balanced","metabolic_age":38,"timestamp":"2021-02-05 14:16:17.439167"}'
And you can listen to the results either with the Node-Red debug window or with:
mosquitto_sub -t '#' -v
Node-Red is very powerful and you will be able to adapt this to fit all your needs.
Push to Google Fit
A good illustration of the Node-Red power is the ability to use Google API’s very easily. One nice feature of the Mi Fit application was to display nicely the measured data, and also to connect to Google Fit to have all your health data in the same place. You obviously should skip this part if you are allergic to the idea of storing health data on a cloud provider. I choose Google to have my data because it seems to me to be less “doubtful” as Mi Fit, has great APIs, and you can get your data back at any time with Google Takeout.
Please note that at this time:
- the data will be stored but not viewable in Google Fit android application (see the last paragraph).
- the authentication of testing applications only last 7 days ; to go beyond this limit you would have to put the application in “production mode” but due to the sensitive data scope, it will require application validation, which is very unlikely for this kind of personal mono user application… (I haven’t tried yet)
Node-Red has a great plugin to use all Google’s APIs: https://github.com/pckhib/node-red-contrib-google-oauth2
In the global menu, go to “Manage Palette”, search for “google.oauth2” and click install:
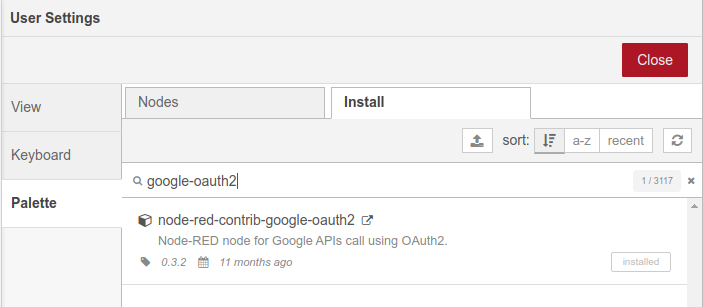
It will add a “Google” node in the “function” section. You will need to authenticate your flow with Google and create some credentials, by following instructions given by the Google node. The Google Developer’s console may seem a little complicated because it has a lot of functionalities, but you need not panic as we only need a few. Create credentials and copy it to your node, and activate the Fit API in the Google console.
You can then start to use the Google node, with a very simple flow to begin with:

If this Google node is very powerful, it has very poor documentation. But the author seems to answer to issues in the GitHub project, so by searching in closed issues you should find the answer you need. It uses the Google Discover service to search for API endpoints and needed parameters. The connection is the place you define your credentials and authentication (do not forget to include all the permissions scope you will need). Then you will choose the API and operation to use.

You will need the Google Developer API Documentation to understand how the API works, and what data to provide to the API. Here is Fitness REST API documentation. Google APIs comes often with an android version and another for REST endpoints. Even if we are interested in the REST one, the android documentation is sometimes more detailed and could provide useful information. In the documentation, we will find that the endpoint to create a data source is:
POST https://www.googleapis.com/fitness/v1/users/userId/dataSources
So we have to provide:
- a parameter called “userId” (the documentation also says that only “me” is supported)
- a resource to be passed in the body part of the POST
The Google node will expect that information to be fed to the node in the msg.payload structure. All parameters will be top-level entries, and the POST will be the value of the “resource” top-level entry. So to create a data source you will need to inject the following msg.payload structure :
{
    "userId": "me",
    "resource": {
        "dataStreamId": "raw:com.google.weight:720140362952:mi_scale_gateway_weight",
        "dataStreamName": "mi_scale_gateway_weight",
        "type": "raw",
        "dataType": {
            "name": "com.google.weight",
            "field": [
                {
                    "name": "weight",
                    "format": "floatPoint"
                }
            ]
        },
        "application": {
            "name": "mi_scale_gateway"
        },
        "dataQualityStandard": []
    }
}
You may now deploy your flow and click on the box on the left of the Inject node to run the corresponding part of the flow.
Note you will need to change the dataStreamId value with your own identifier. You can either delete the “dataStreamId” entry and retrieved the one generated in the result, or modify it with the value provided in the error.
Once the data source created, you will be able to add a value. I suggest you try step by step on a specific flow with the inject /API / debug pattern described above. And then, when everything is working as you want, you can add this Google branch to your previous flow. Here is the one I use (and here to download the flow script to import: node_red_miscale_flow_with_google):
The data are correctly stored in Google Fit data, and history can be retrieved, but for some reason, it does not show in the Google Fit android application… Any comment welcome if you know how to do it! After some research, it seems that there is special software validation done by Google to work with protected data types, as weight is. Google is currently reviewing its way of handling protected data, I hope they will end in a solution that will allow those data to show up in the application 🙂


Température Bluetooth LE dans domoticz par reverse engineering et MQTT auto-discovery Home Assistant
À la recherche de thermomètres simples à intégrer à mon installation domotique, je suis tombé sur des capteurs Bluetooth LE très bons marchés, mais pour lesquels il n’existait pas d’intégration disponible. J’ai donc cherché à faire cette intégration, à la découverte du reverse engineering Android, du protocole Bluetooth LE et...
Commandez vos lumières avec des interrupteurs RF sous Domoticz
Dans l’article précédent, nous avions répliqué une télécommande RF (Radio Fréquence) pour pouvoir commander depuis Domoticz un variateur RF, mais nous avions également vu les limites de ce mode de communication dans Domoticz, notamment par l’absence de retour d’état du device. Nous allons faire l’inverse dans ce billet, à savoir...

Répliquer une télécommande RF avec Raspberry Pi
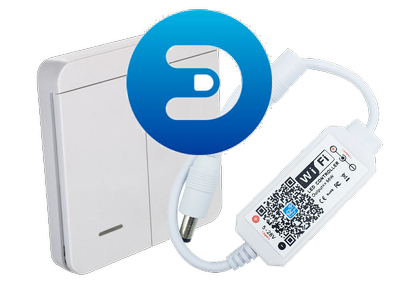
Pour mon premier bandeau LED, j’ai acheté un mini-variateur LED commandable avec une télécommande RF (Radio Fréquence).
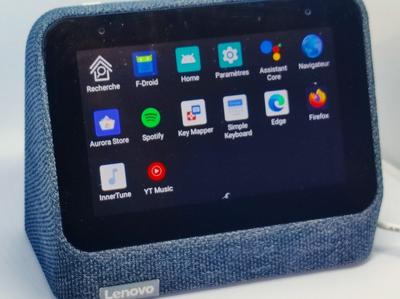
Hacks pour Lenovo Smart Clock 2
En bidouillant un peu, il est possible de débloquer le Lenovo Smart Clock 2 pour utiliser Spotify, Alexa, ou même une télécommande Domoticz, Alexa ou Google TV.