Add a second camera to OctoPi
OctoPrint is a great tool to control your 3D printer but offers by default only one camera (which can be the native raspberry one or a usb one). But one camera is not enough to be able to monitor the hotend and to take a nice timelapse of your item while printing. So I decided to add a second camera to the raspberry. There is an excellent plugin “MultiCam” that does most of the job, but there is still some configuration to do.
First you need another camera 🙂 As the camera slot is already used by the main camera we will need to use a USB camera. There is very cheap ones like this one I bought for about 2€. It is a very low quality and the image is not very good, but it is good enough for what I want to do (note that you may need to adjust focus). Depending on your raspberry’s number of USB ports and if you are connected by ethernet or with a Wifi USB key you may also need a USB Hub. You will also find cheap ones for about 1€. Note that the USB power from the raspberry is low, and you may experience some problems. You need to be able to connect through SSH to your raspberry to have access to the command line and to be able to modify some configuration files.
Once connected you must first check your USB camera is working properly. We will use mjpg_streamer for that :
cd ~/mjpg-streamer/
./mjpg_streamer -o "output_http.so -w ./www -n -p 8090" -i "input_uvc.so"
You may then check on http://octopi.local:8090 that you are viewing an image properly.
Please note that :
- You may need to adjust parameters of input regarding your camera (like size, framerate,…)
- The position of the quotes is not an error : the plugin and its parameters should be in the same parameter, so you have to quote it. If you must add a framerate paramater is will be : -i “input_uvc.so -f 10”
- It is mandatory to use another port than the default 8080 because this one will be used with the raspberry camera
If the camera is working well we will automate the launch of the camera by modifying the /root/bin/webcamd script. As it is in root folder you must first sudo to root (with ‘sudo su’). Here is the resulting script :
#!/bin/bash

########################################################################
### DO NOT EDIT THIS FILE TO CHANGE THE CONFIG!!!                    ###
### ---------------------------------------------------------------- ###
### There is no need to edit this file for changing resolution,      ###
### frame rates or any other mjpg-streamer parameters. Please edit   ###
### /boot/octopi.txt instead - that's what it's there for! You can   ###
### even do this with your Pi powered down by directly accessing the ###
### file when using the SD card as thumb drive in your regular       ###
### computer.                                                        ###
########################################################################

MJPGSTREAMER_HOME=/home/pi/mjpg-streamer
MJPGSTREAMER_INPUT_USB="input_uvc.so"
MJPGSTREAMER_INPUT_RASPICAM="input_raspicam.so"

# init configuration - DO NOT EDIT, USE /boot/octopi.txt INSTEAD!
# BEGIN - MODIFICATION
camera="both"
#camera_usb_options="-r 640x480 -f 10"
camera_usb_options=""
camera_raspi_options="-fps 10"
camera_http_webroot="./www-octopi"
camera_http_options="-n"

camera_http_options_both_base="$camera_http_options"
camera_http_options_both_usb="-p 8090"
additional_brokenfps_usb_devices=()

#if [ -e "/boot/octopi.txt" ]; then
#    source "/boot/octopi.txt"
#fi

# END - MODIFICATION

brokenfps_usb_devices=("046d:082b" "${additional_brokenfps_usb_devices[@]}")

# cleans up when the script receives a SIGINT or SIGTERM
function cleanup() {
    # make sure that all child processed die when we die
    local pids=$(jobs -pr)
    [ -n "$pids" ] && kill $pids
    exit 0
}

# says goodbye when the script shuts down
function goodbye() {
    # say goodbye
    echo ""
    echo "Goodbye..."
    echo ""
}

# runs MJPG Streamer, using the provided input plugin + configuration
function runMjpgStreamer {
    input=$1
    pushd $MJPGSTREAMER_HOME > /dev/null 2>&1
        echo Running ./mjpg_streamer -o "output_http.so -w $camera_http_webroot $camera_http_options" -i "$input"
        LD_LIBRARY_PATH=. ./mjpg_streamer -o "output_http.so -w $camera_http_webroot $camera_http_options" -i "$input" &
# BEGIN - MODIFICATION
#        wait
# END - MODIFICATION
    popd > /dev/null 2>&1
}

# starts up the RasPiCam
function startRaspi {
    logger -s "Starting Raspberry Pi camera"
    runMjpgStreamer "$MJPGSTREAMER_INPUT_RASPICAM $camera_raspi_options"
}

# starts up the USB webcam
function startUsb {
    options="$camera_usb_options"
    device="video0"

    extracted_device=`echo $options | sed 's@.*-d /dev/\(video[0-9]+\).*@\1@'`
    if [ "$extracted_device" != "$options" ]
    then
        # the camera options refer to another device, use that for determining product
        device=$extracted_device
    fi

    uevent_file="/sys/class/video4linux/$device/device/uevent"
    if [ -e $uevent_file ]; then
        # let's see what kind of webcam we have here, fetch vid and pid...
        product=`cat $uevent_file | grep PRODUCT | cut -d"=" -f2`
        vid=`echo $product | cut -d"/" -f1`
        pid=`echo $product | cut -d"/" -f2`
        vidpid=`printf "%04x:%04x" "0x$vid" "0x$pid"`

        # ... then look if it is in our list of known broken-fps-devices and if so remove
        # the -f parameter from the options (if it's in there, else that's just a no-op)
        for identifier in ${brokenfps_usb_devices[@]};
        do
            if [ "$vidpid" = "$identifier" ]; then
                echo
                echo "Camera model $vidpid is known to not work with -f parameter, stripping it out"
                echo
                options=`echo $options | sed -e "s/\(\s\+\|^\)-f\s\+[0-9]\+//g"`
            fi
        done
    fi

    logger -s "Starting USB webcam"
    runMjpgStreamer "$MJPGSTREAMER_INPUT_USB $options"
}

# make sure our cleanup function gets called when we receive SIGINT, SIGTERM
trap "cleanup" SIGINT SIGTERM
# say goodbye when we EXIT
trap "goodbye" EXIT

# echo configuration
echo "Starting up webcamDaemon..."
echo ""
echo "--- Configuration: ----------------------------"
echo "camera:        $camera"
echo "usb options:   $camera_usb_options"
echo "raspi options: $camera_raspi_options"
echo "http options:  -w $camera_http_webroot $camera_http_options"
echo "-----------------------------------------------"
echo ""

# we need this to prevent the later calls to vcgencmd from blocking
# I have no idea why, but that's how it is...
vcgencmd version > /dev/null 2>&1

# keep mjpg streamer running if some camera is attached
# BEGIN - MODIFICATION
while true; do
    if [ -e "/dev/video0" ] && { [ "$camera" = "auto" ] || [ "$camera" = "usb" ] || [ "$camera" = "both" ]; }; then
	if [ "`vcgencmd get_camera`" = "supported=1 detected=1" ] && [ "$camera" = "both" ]; then
                camera_http_options="$camera_http_options_base"
 		startRaspi
		sleep 10 &
		camera_http_options="$camera_http_options_both_base $camera_http_options_both_usb"
	fi
	startUsb
	sleep 10 &
# END - MODIFICATION
        wait
    elif [ "`vcgencmd get_camera`" = "supported=1 detected=1" ] && { [ "$camera" = "auto" ] || [ "$camera" = "both" ] || [ "$camera" = "raspi" ] ; }; then
        startRaspi
        sleep 30 &
        wait
    else
        echo "No camera detected, trying again in two minutes"
        sleep 120 &
        wait
    fi
done
I have modified three sections delimited by the comments “# BEGIN/END MODIFICATION” :
- In the parameters sections I have added parameters to be able to run both cameras and disabled the use of /boot/octopi.txt to have to modify only one file
- I commented the wait just after the mjpg_streamer command to be able to run another one
- I modified the script to support both cameras at the same time. Note that the script should work if you disconnect one of the cameras (or modify back the camera parameter to another value than ‘both’)
Then you will need to modify the /etc/haproxy/haproxy.conf to add an URL that may be used in octoprint.
global
        maxconn 4096
        user haproxy
        group haproxy
        log 127.0.0.1 local1 debug

defaults
        log     global
        mode    http
        option  httplog
        option  dontlognull
        retries 3
        option redispatch
        option http-server-close
        option forwardfor
        maxconn 2000
        timeout connect 5s
        timeout client  15min
        timeout server  15min

frontend public
        bind *:80
        bind 0.0.0.0:443 ssl crt /etc/ssl/snakeoil.pem
        option forwardfor except 127.0.0.1
        use_backend webcam if { path_beg /webcam/ }
	use_backend usbcam if { path_beg /usbcam/ }
        default_backend octoprint

backend octoprint
        acl needs_scheme req.hdr_cnt(X-Scheme) eq 0

        reqrep ^([^\ :]*)\ /(.*) \1\ /\2
        reqadd X-Scheme:\ https if needs_scheme { ssl_fc }
        reqadd X-Scheme:\ http if needs_scheme !{ ssl_fc }
        option forwardfor
        server octoprint1 127.0.0.1:5000
        errorfile 503 /etc/haproxy/errors/503-no-octoprint.http

backend webcam
        reqrep ^([^\ :]*)\ /webcam/(.*)     \1\ /\2
        server webcam1  127.0.0.1:8080
        errorfile 503 /etc/haproxy/errors/503-no-webcam.http

backend usbcam
        reqrep ^([^\ :]*)\ /usbcam/(.*)     \1\ /\2
        server webcam1  127.0.0.1:8090
        errorfile 503 /etc/haproxy/errors/503-no-webcam.http
It adds /ubscam/ to access the new port :8090 we created above.
It is now time to go to OctoPrint to finalize the configuration. To ensure the new files are taken in account, you must restart the corresponding services. If you are not sure, just restart the raspberry. In OctoPrint, add the “MultiCam” plugin. Then go to its configuration and add another camera with URL “/usbcam/?action=stream”. Save, and that’s it !


Votre tête en modèle STL 3D à partir d’une IRM Cérébrale
À partir de résultats d’une imagerie par résonance magnétique (IRM) il est possible de découvrir le monde merveilleux de l’imagerie médicale, et même d’en créer des modèles 3D.

Migration vers Proxmox
Retour d’expérience sur la migration de mon serveur historique monolithique vers une infrastructure Proxmox et des composants containerisés. Cette transition aura duré plus d’un an, avec différentes phases progressives pour lisser les évolutions dans le temps, quand j’ai le temps de m’en occuper, et sans pour autant avoir de coupure...

Sécuriser votre infrastructure maison avec Proxmox, OPNsense, Traefik, Home Assistant et PKI XCA
Cette stack regroupe le routage, le firewall, la gestion des certificats, le reverse proxy et l’authentification autour d’une logique simple : un point d’entrée clair, des services bien isolés, et une séparation nette entre certificats internes et publics.
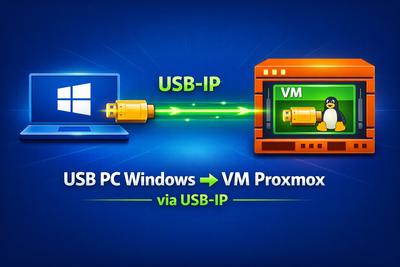
USB d'un PC Windows distant dans une VM Proxmox via USB-IP
Ce tutoriel explique comment partager un périphérique USB connecté à un PC Windows distant avec une machine virtuelle Linux sous Proxmox, en utilisant usbipd-win (serveur Windows) et le client USB/IP Linux.