RF433 buttons automation for MagicHome LED controllers
I keep improving the remote control of my MagicHome compatible LED controllers with RF433 buttons, my previous versions are described in the following posts:
- a first version with Domoticz and a RFLink on Arduino Mega (in french)
- a second version with Domoticz, rtl_433 and a RTL-SDR USB dongle (in french)
But it needs that my PC hosting Domoticz is up and running, and all the LED controllers keeps the same IP address (sometime lost when the router of my internet provider has issues). And as I am converting more and more of my lamps to this method, any issue is now much critical. So I want to try a lighter and more resilient solution.
The new setup
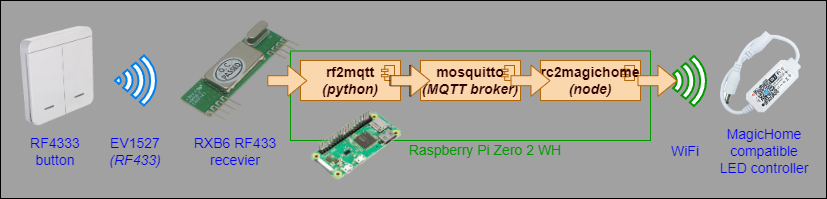
My new setup is now using:
- RF433 buttons (same as before) sending EC1527 RF433 signals
- a RF433 receiver module decoding EV1527 protocol (like RXB6 or clones) plugged on the Raspberry Pi,
- a Raspberry Pi Zero W2, as it is now again available at an affordable price and should be capable of a quite decent uptime ; it will run:
- rf2mqtt software, reading RF433 signals and sending them to MQTT
- mosquitto as local MQTT broker
- rc2magichome, subscribed to MQTT remote signals, and sending commands to MagicHome devices through WiFi
- and the same MagicHome compatible LED controllers previously used
You may think it is a quite complicated setup, but there are alternatives:
- NodeRed (see alternative at the end of the article): can be edited with a graphical editor, but become quite complicated with a lot of remotes and controllers, and to implement advanced functions. No discovery available (so it will not be able to update controller IPs in case of changes)
- do not use rf2mqtt and mosquitto by integrating rpi_rf functions directly in rc2magichome: true, maybe one day, but decoupling detection and action with MQTT enable other usages of the remote RF interface (including remotes non-related to MagicHome controllers)
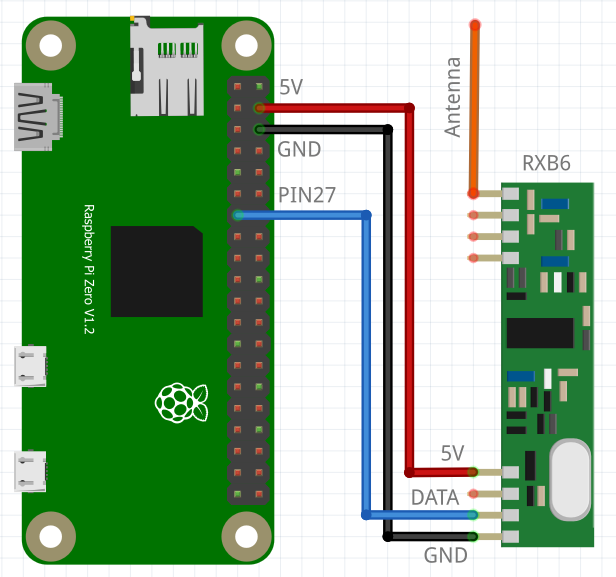
Wiring RF433 receiver on the Raspberry Pi
The wiring part is pretty easy, only three wire and the antenna to wire/soldier, by following the schematic below:
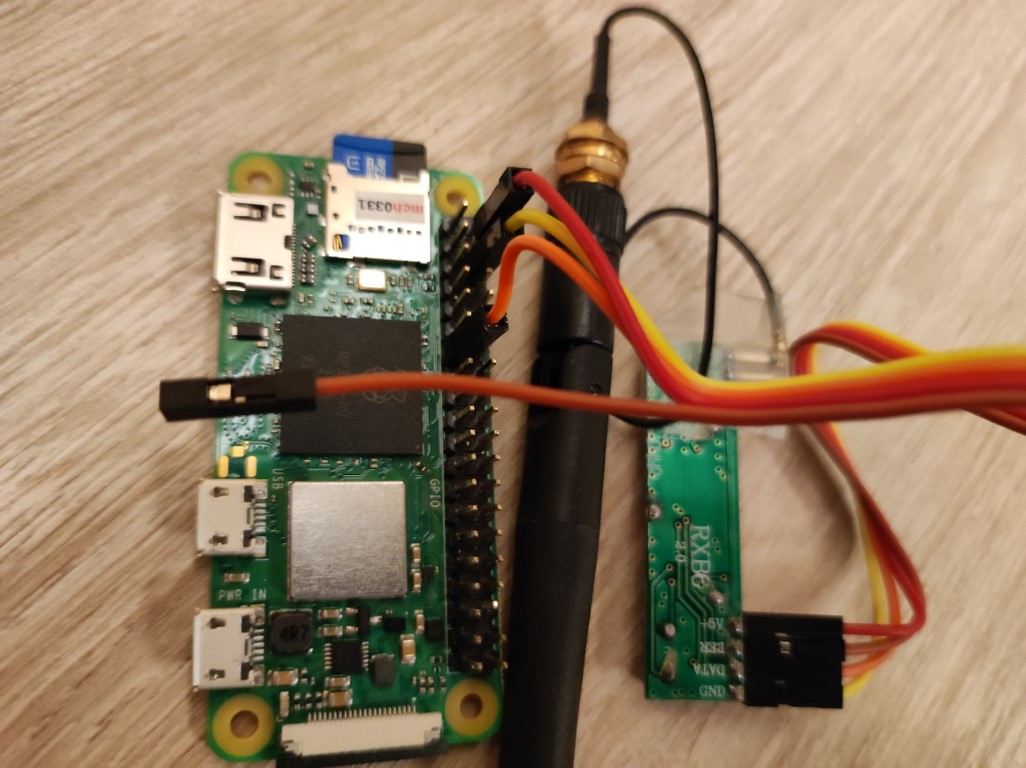
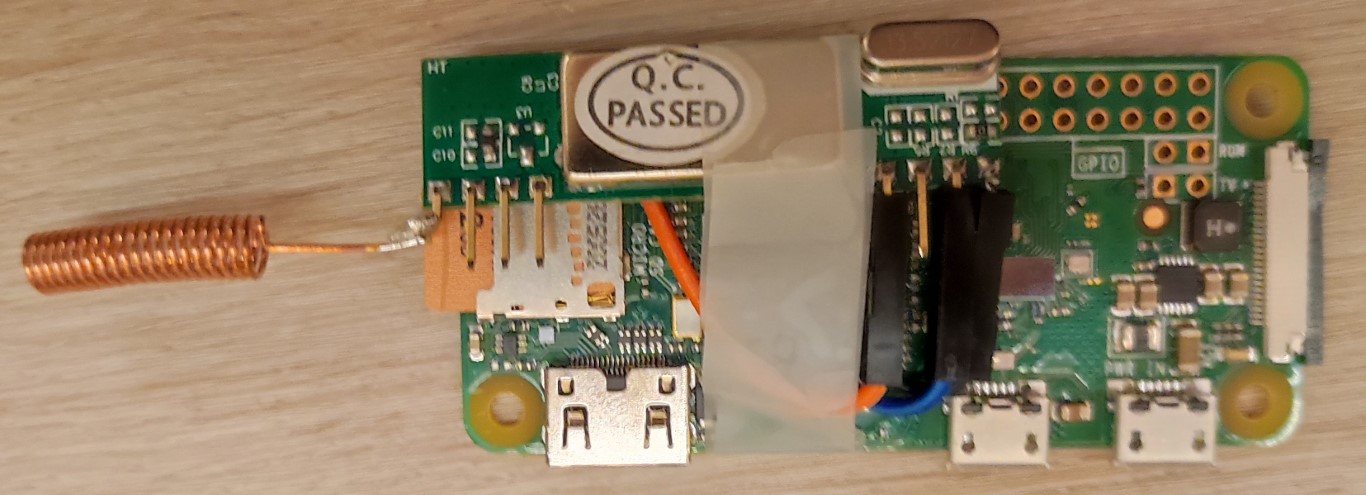
Here are mines, on the left my Raspberry Pi Zero 2 with headers for prototyping, and on the right the final version with my Raspberry Pi Zero with soldered wires.
Configure a lighter Raspberry Pi with DietPi
As this Raspberry Pi is intended to be used only for automation purpose, and not with a graphical interface, or desktop tools, there is no point to install the default OS. There is a lite version of Raspberry Pi OS without the desktop software for this purpose. But a community has gone a step further and have created a “very lite” version. It is called DietPi and it is available also for other platforms. As the Raspberry Pi Zero is quite low in resources, I decided to test this. If you use Raspberry Pi Zero 2, as it is the same CPU as the Pi 3, you should download the Raspberry Pi 2/3/4 version of DietPi.
Installation is pretty similar to Raspberry Pi OS. You may use Raspberry Pi Imager and select the DietPi image you have downloaded.
 Additional useful tools I installed:
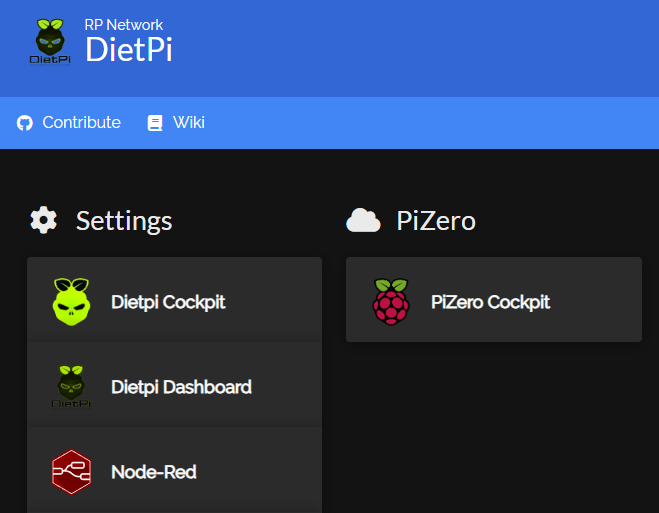
- homer is a tiny static homepage ; I use it to have a nice portal to remember URL and ports of web services installed on my device :
sudo apt install lighttpd && sudo dietpi-software install 205 - cockpit is a cool tool to administrate on your Raspberry Pi remotely, Among administrative tools there is a remote terminal embedded that it handy to use in the browser without the need to run a ssh client
sudo apt install cockpit - dietpi-dashboard is another administration and dashboard tool, a bit similar as cockpit :
sudo dietpi-software install 200
Install mosquitto
We need a MQTT broker for our new setup. As I want this to be as autonomous and resilient as possible, I don’t want to use the MQTT broker hosted on my server. So we will install another one locally that will be dedicated to the Raspberry Pi. We will use mosquitto MQTT open source server:
sudo dietpi-software install 123
It comes by default with authentication (default username is mosquitto with root password) ; for our use, it will be simpler with anonymous access (but it should also work with authenticated user specified in MQTT connection string). Do not do this if your Raspberry Pi is exposed on internet. To do so, edit /etc/mosquitto/mosquitto.conf, add the directive allow_anonymous true, save and restart mosquitto sudo systemctl restart mosquitto.service. Ensure mosquitto is started at startup by checking the service is “enabled” with the command sudo systemctl status mosquitto.service
You may also bridge this MQTT broker to your main MQTT broker if you have one ; based on this tutorial, create the config file /etc/mosquitto/conf.d/bridge-server.conf:
connection bridge-server

address 192.168.0.1:1883
# remote_password verysecret
# remote_username bridge
# remote_clientid level02-line01-broker

topic # both 0 rc/ rpiw2/rc/
This will bridge bidirectionnaly the local topic rc used by rf2mqtt and rc2magichome to the topic rpiw2/rc/ on the remote MQTT server.
Install rf2mqtt
To install rf2mqtt for the above setup, the steps below were used:
sudo apt install virtualenv
git clone https://github.com/matfra/rf2mqtt
The default setup of rc2mqtt use a dockerized mosquitto MQTT server. As we have installed a local mosquitto server in the above section we do not need this. So edit install.sh and :
- comment out the docker mosquitto part (the line stating with
docker run) - remove the docker entry in dependancies list (in the
for dep inlist)
You can then run the modified install script with
sudo ./install.sh
If you encounter errors with version 2.0.0 of paho.mqtt, you may need to specify version in requirements file paho-mqtt==1.6.1 and re-run ./install.sh
Default version of rf2mqtt also filters some remote command with a prefix that does not suit all remotes (including mine), to disable this filter, edit rf2mqtt.py and in the function check_if_allowed uncomment the return True directive, and restart rf2mqtt.
You can now connect to MQTT server with a GUI like MQTT Explorer or with the command line below (you will need to install mosquitto clients with sudo apt install mosquitto-client)
mosquitto_sub -t rc
You should see the remote codes be displayed when pushing your remote buttons. Try each button several time (depending on the model, the button should be pressed neither too shortly, not too long), the code should be the same for each press (first ones can be sometimes wrong), and note for each button the code that is the same in most of the cases.
Install and configure rc2magichome
To match the below requirements, I have finally implemented my own RF MagicHome automation system. I wanted it to:
- be very lightweight to run on the Raspberry Pi
- be able to discover the devices if their IP changes, and to cache those IPs to avoid delay when using a button
- be simple to configure, but also flexible to match my remote needs (multiple remote commanding multiple LED controllers with multiple light level based on current state)
There is a nice nodejs packet node-magichome implementing the MagicHome interface, and include discovery feature. So I wrote my program in javascript. As we get data from MQTT I also used MQTT.js
To install rc2magichome
sudo apt install nodejs npm   # you may remove npm after install if you need space
git clone https://github.com/rpeyron/rc2magichome
sudo sh install.sh
To configure, please update config.local.js (local file, will not be updated by upstream updates)
You should remove any default configuration and only keep the one you need to modify.
You need to restart the systemd after any configuration update with systemctl restart rc2magichome.service
Minimal configuration is:
export default {
    mqttConnectString: "mqtt://127.0.0.1",    // Connection string to MQTT server
    mqttConnectTopic: "rc",           // MQTT Topic to read remote codes
    updateStatesIntervalMs: 5000,     // Interval (ms) between each cached state polling
    scanIntervalMs: 5 * 60 * 1000,    // Interval (ms) between each device discovery/updates

    /** @type Array<import("./devices-cache").DeviceDefinition> */
    devices: [
        { title: "MyDevice1", id: "0123456789AB", address: "192.168.1.42" },
    ],

    /** @type Array<import("./remote").Remote> */
    remotes: [
        /* Example for a simple (and most common) switch for a device */
        {
            title: "MyToggleSwitch",
            rc: "1234567",
            toggle: ["MyDevice1"],
        },
    ],
}
It is optional to give the IP address in the devices block as it will be autodiscovered, but if you need it to work immediately before having discovery completed, it can be useful.
And more advanced config can be done to include custom functions:
    (...)
    /** @type Array<import("./remote").Remote> */
    remotes: [
        /* Example of more advanced custom function on a set of devices to have multiple levels on the same switch */
        {
            title: "MyCustomSwitch",
            rc: "124781",
            devices: ["MyDevice1", "MyDevice2"],
            function: async (devices, states) => {
                let curState = states[0]
                if (!curState?.on) {
                    devices.forEach(async d => d && await d.setWhite(10) && await d.setPower(true))
                } else if (curState?.on && (curState?.white == 10 || curState?.white == 255)) {
                    devices[0]?.setWhite(20)
                    devices[1]?.setWhite(100)
                } else if (curState?.on && (curState?.white == 50)) {
                    devices[0]?.setWhite(255)
                    devices[1]?.setWhite(255)
                } else {
                    devices[0]?.setWhite(50)
                    devices[1]?.setWhite(255)
                }
            }
        },
    ],
    (...)
See src/config.js for full configuration options documentation.
Alternative with NodeRed
It is possible to replace the action rc2magichome script with some NodeRed automation. The NodeRed flow will:
- listen to the MQTT topic published by rf2mqtt (same installation of rf2mqtt and mosquitto as describe in the previous section)
- calculate what to do
- send the order to the MagicHome controller
To install NodeRed on dietpi:
sudo dietpi-software install 122
NodeRed is then available on http://<your raspberry IP>:1880/
And to be able to control MagicHome device from NodeRed, you will need to install the palette node-red-contrib-magic-home-local:
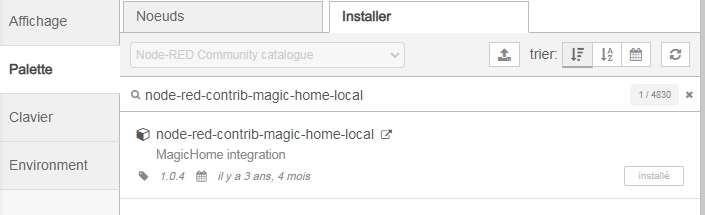
The flow become quickly a bit complicated, for instance on the draft below:
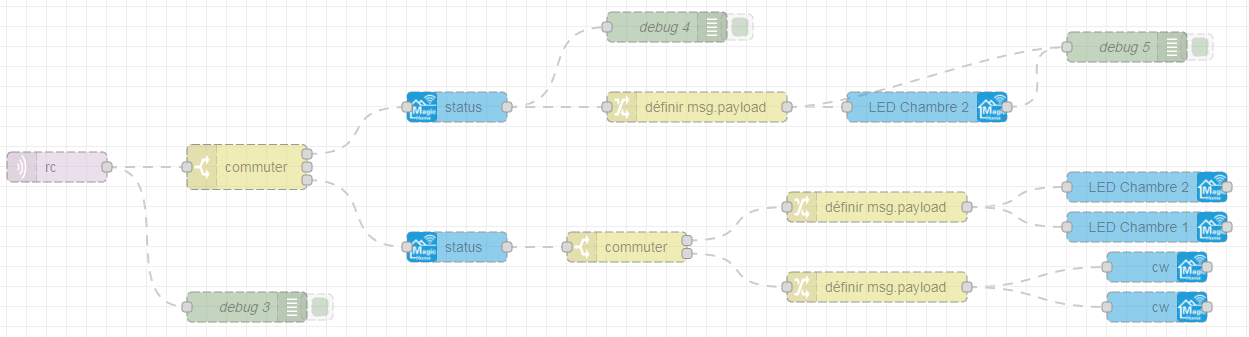
- Subscribe to MQTT topic
- Select the corresponding remote
- Query the corresponding MagicHome controller to get current state
- And based on its state, format the order to be send to the MegicHome controllers (two LED controller controlled by the same remote in this case)
You have to duplicate this for each pair of remotes/controllers you want to use, and add some more complexity if you want complex rules, as we can do with rc2magichome…

Commandez vos lumières avec des interrupteurs RF sous Domoticz
Dans l’article précédent, nous avions répliqué une télécommande RF (Radio Fréquence) pour pouvoir commander depuis Domoticz un variateur RF, mais nous avions également vu les limites de ce mode de communication dans Domoticz, notamment par l’absence de retour d’état du device. Nous allons faire l’inverse dans ce billet, à savoir...

Répliquer une télécommande RF avec Raspberry Pi
Pour mon premier bandeau LED, j’ai acheté un mini-variateur LED commandable avec une télécommande RF (Radio Fréquence).

Un écran tactile autonome Home Assistant avec un Raspberry Pi Zero 1
Je souhaitais un moniteur Home Assistant indépendant et tactile. Il existe de nombreuses méthodes plus ou moins simples. Les méthodes qui semblent les plus simples passent par l’utilisation d’une tablette Android et d’un navigateur en mode Kiosque (exemple sur cet article avec la tablette Blackview Tab90, 140€ pour 11 pouces)....

Optimiser la taille de la base de données de Home Assistant
Si on ne fait pas attention, la base de données Home Assistant peut rapidement devenir obèse avec plusieurs centaines de méga-octets. Il est probable qu’elle stocke beaucoup d’information qui n’est pas utile à conserver. Voici quelques trucs pour identifier et réduire à ce qui vous intéresse.