Virtual Disk creation on Windows
All versions of Windows have great support for virtual disks that is not well-known. And if you have access to a Windows Pro computer, you can encrypt them and make good encrypted containers that are useable on every modern Windows without the need for third-party tools.
The virtual disk part
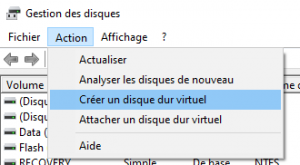
Create a Virtual Disk is fairly easy with the Computer Management utility. This is a great standard tool that has been somewhat hidden in modern Windows. You will find it within “Administration tools” in “System Windows” submenu. In this application, you will find the Disk Management tool (you may also search directly for “Disk Management”, “Partition management”) :

1. Use menu “Action” / “Create VHD” to create a virtual disk
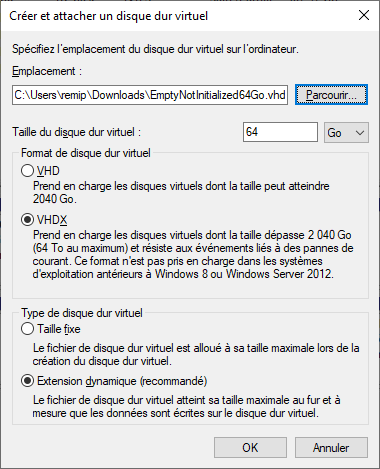
2. Select VHDX, dynamically expand option, and the maximum size you want. Change the size of the disk is possible but not really easy with Windows 10 Home so you may want to select a large disk. (With Windows 10 Professional you will be able to expand virtual disks with Hyper-V management tools)

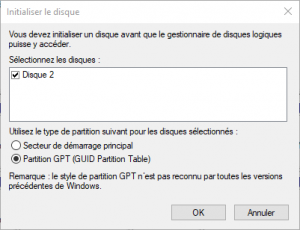
3. You will then need to initialize the disk with a partition system, either with ‘old’ MBR or newer GPT. I personally prefer to be up to date but as we will see later, GPT will take a little more initial disk space.
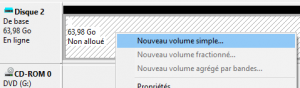
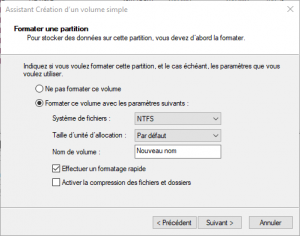
4. And then you can create a partition by right-clicking on the unused space. You can select the whole disk, or a smaller size if you do not want that your expandable disk grow to fast. Unlike disk resizing, partition resizing is fairly easy with the same tool. So you can start low and make grow the disk later. You may choose exFAT or NTFS. As with GPT, I prefer up-to-date technology and choose NTFS.
You have now a working virtual disk, and will see the new disk in explorer.
To disconnect it, you may either :
- in explorer right-click on the disk, and click “Eject” (if you have created multiple partitions on the same virtual disk, you must eject each to disconnect the virtual disk)
- in the disk management tool, right-click on the virtual drive, and click “Detach virtual disk”
To re-connect it later, just double-click on the VHDX file in explorer!
The BitLocker part
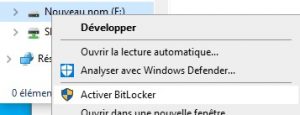
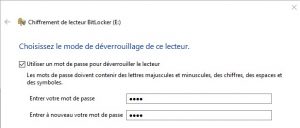
To add the encryption with BitLocker, right-click on your mounted partition of the virtual drive in explorer, and click “Activate BitLocker” and follow steps: Enter a strong password, save the recovery information safely, encrypt only used space and keep other parameters default.
Disconnect/eject the drive, and you have now a standalone BitLocker container that will work on every Windows 10 PCs Pro of Home editions. Interestingly enough, you will benefit all functionalities of BitLocker on all editions, like the ability to change passwords and copy it. Only limitation is that they will all share the recovery information. If you are a Windows 10 Home only user, ask a friend or colleague who has access to one to follow those steps and give you the VHDX file. You will be able to change the password (but your friend or colleague had access to the recovery key).
A little comparison of containers sizes
I was a little confused about the sizes of the files that were created empty, so here are some elements. Note it is only about empty containers, I guess the differences will go away with the use with real contents.
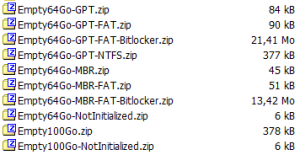
I first created a bunch of virtual disk drives with different settings :
A not initialized virtual disk takes no space :

GPT will take more space than MBR, and NTFS more than FAT. If you want the minimal size, select MBR partitioning system and exFAT partition format :

BitLocker will require more space :
What is interesting is that the files can be compressed very well, reducing to only 377kB for NTFS/GPT, or 13 Mo for a Bitlocker/exFAT/MBR virtual disk.
So you can prepare some empty disks and store them with no space!
I still was confused with the size of empty VHDX created from USB disks with the disk2VHD utility:

Unfortunately, you cannot run Disk2VHD on virtual drives… That would have been fun! As it maybe due to some preallocation space, I wanted to convert it with no preallocation and see if that changes something.
Playing with QEmu-img
A handy free tool to deal with virtual disk images is qemu-img from QEmu. It is available for Windows and Linux and will allow you to do all shrink, resize, and conversions between qcow2 (QEmu native format), vmdk (VMWare native format), vhi (Virtual Box native format) and vhdx (Hyper-V native format).
I first tried a direct conversion from VHDX to VHDX with:
qemu-img.exe convert -f vhdx -O vhdx -o subformat=dynamic Empty100Go.vhdx Empty100Go-converted.vhdx
Total failure, it made the file grew from 196 Mo to almost full expanded size! (86 Go vs 100 Go total size)
Oddly, when converting to qcow2 and then back to vhdx, it works better:
qemu-img.exe convert -f vhdx -O qcow2 -o preallocation=off Empty100Go.vhdx Empty100Go-converted.qcow2
qemu-img.exe convert -f qcow2 -O vhdx -o subformat=dynamic Empty100Go-converted.qcow2 Empty100Go-converted.vhdx
The resulting file is 168 Mo, so less than the original 196 Mo. Note that the temporary qcow2 file size is 2.75 Go, which is a little surprising with preallocation=off…
So in the end, minimal sizes of empty containers were obtained :
- with zipped files
- with MBR & exFAT filesystem (over GPT & NTFS)
- with the use of Disk2VHD on empty USB stick (over creating with disk management utility)
Again, these size comparisons do only apply to empty containers. It is very likely that space gaps will reduce heavily while using it with real content.
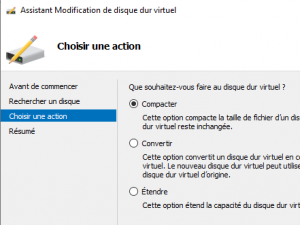
Note that if you have Windows 10 Pro, you may install Hyper-V optional feature and have extra tools to work with VHDX file in the Hyper-V console management, with the menu “Action” “Modify disk” you will be able to shrink, expand and convert VHDX virtual disks.

Création de disques virtuels sous Windows
Toutes les éditions de Windows 10 ont un support de disques virtuel qui est méconnu. Et si vous avez accès à la version Windows 10 Pro, vous pouvez le crypter avec BitLocker pour en faire un container crypté qui fonctionnera sur toutes les éditions de Windows sans besoin de logiciel...

Disque non persistant sous QEmu (Transient) et VMWare
J’utilise depuis longtemps la fonctionnalité de disque non persistant sous VMWare ; c’est très pratique pour tester un logiciel ou une opération sans pour autant modifier la machine virtuelle. En effet à l’extinction de la VM, les modifications apportées au disque seront supprimées et la VM sera comme si vous...
Machine virtuelle avant réinstallation
J’ai du réinstaller mon Windows récemment, car celui-ci s’était bizarrement corrompu au niveau des pilotes réseau et toute nouvelle installation de drivers plantait, supprimant ainsi petit à petit mes interfaces réseau. Windows 10 est cependant un OS très stable par rapport à ses prédécesseurs, car 5 ans entre deux réinstallations...

Migration vers Proxmox
Retour d’expérience sur la migration de mon serveur historique monolithique vers une infrastructure Proxmox et des composants containerisés. Cette transition aura duré plus d’un an, avec différentes phases progressives pour lisser les évolutions dans le temps, quand j’ai le temps de m’en occuper, et sans pour autant avoir de coupure...