Introducting
RPhoto is a small piece of software to enhance your digital pictures by easy operations in a quick and handy user interface :
- Crop photos while keeping the 4:3 ratio (or whatever ratio you would prefer), without any loss of quality
- Adjust inclinaison of photos taken not perfectly horizontally.
- Add a comment on your JPEG pictures
- And many other usefull features : consult Exif information, move or rename files, undo,...
Common Use
A common way to use the application is shown below :
- Run the application, and set up of some settings.
- Correct inclinaison of the picture if necessary
- Crop to make a better photo
- Add a comment
- Save the file and go to the next one.
Launch of RPhoto, Workspace, and a few useful settings.
Run the application, and select in the Browse tab the forder that will be your workspace. Before modifying your pictures, ensure you have kept a backup in a safe place. Select the first image in the directory ; it will display in the main panel.
Choose your target format : 4:3 for digital pictures, 24:36 for paper pictures, or in any other format you like. You may choose also other settings as your prefered orientation, a destination folder, and many other settings.
Rotation / Inclinaison correction
Use the buttons Rotate Left / Rotate Right or shortcuts l (left) / r (right) to rotate the picture by 90°.
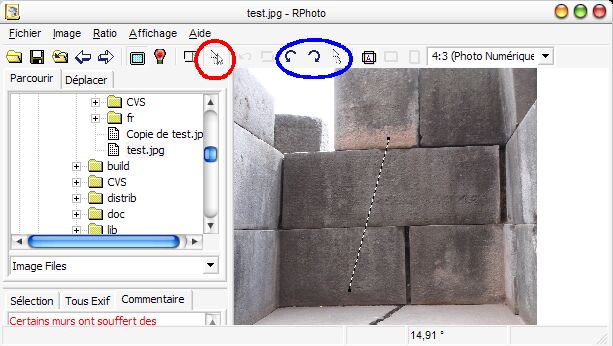
But if the photo had been taken with a wrong angle, you will need to correct inclinaison (this cannot be done lossless) :
- Select the mode inclinaison (with the toolbar, the menu or the shortcut 'i') ; lossless mode is automatically disabled.
- Draw with the mouse what should be an horizontal or vertical line on the photo.
- Rotate the image by using the toolbar, or shortcutr "Return") ; please wait a few seconds to let the picture be rotated.
- If the result does not fit you, you can cancel it by pressing Ctrl-Z (or with the menu Edit / Undo), and do it again.
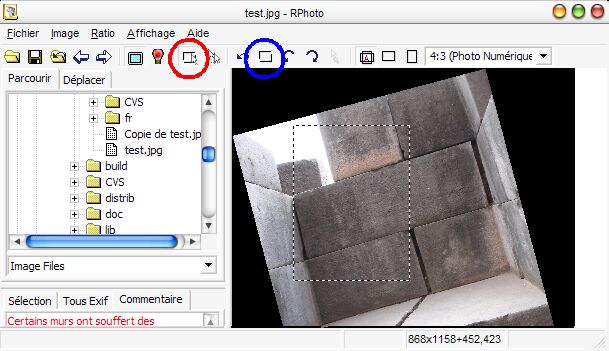
Cropping
Unless you are skilled photograph, your picture could probably look better if it were cropped to a more appropriate set up. This task is fairly easy with RPhoto :
- Make sure to be in "crop" mode ; if not, use the toolbar button or type "c"
- Select the picture region you want
- Crop the picture by using the crop button, or the shortcut "Return" (or "c" again).
- If the result does not fit you, you can cancel it by pressing Ctrl-Z (or with the menu Edit / Undo), and do it again.
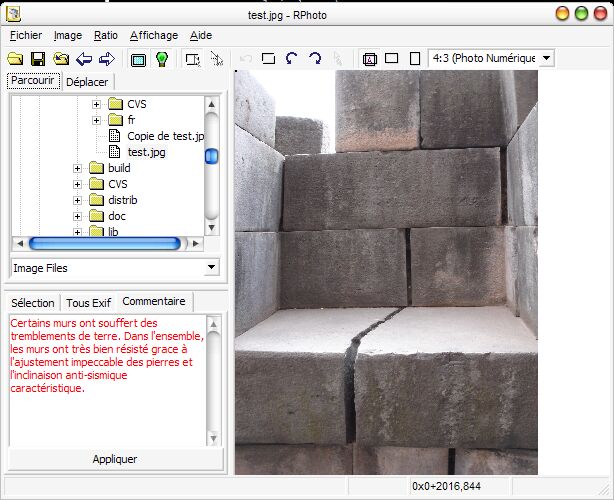
Add a comment
Activate the "Comment" tab, or use the shortcut "t" and type your text in the text field.
Then, press the "Apply" button, or use the shortcut Ctrl-Return; your text should now be displayed in black, and is now memorized to be saved with the file.
Save and Go To Next
Save the file (shortcut 's', or not necessary if you have set the autosave function), and go to the next file with the shortcut "PageDown".
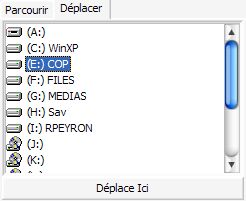
Rename and Move the picture
Two other commonly used features :
- Rename a file : clic another time on the filename in the tree of "Browse" tab ; you can now edit the filename.
- Move a file : if the "Move" tab, choose the target folder, and then clic on "Move Here" (or use the shortcut "m" (move).)
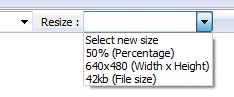
Resizing
If you want to resize the image, select the new size you want in the combo box, or enter the text of the new size. You must comply with allowed formats shown as examples (percents, fixed size, or wanted size on the disk, in kilo-bytes).
The full documentation of features is shown below.
Reference of all features of RPhoto
Presentation of all sections of the screen
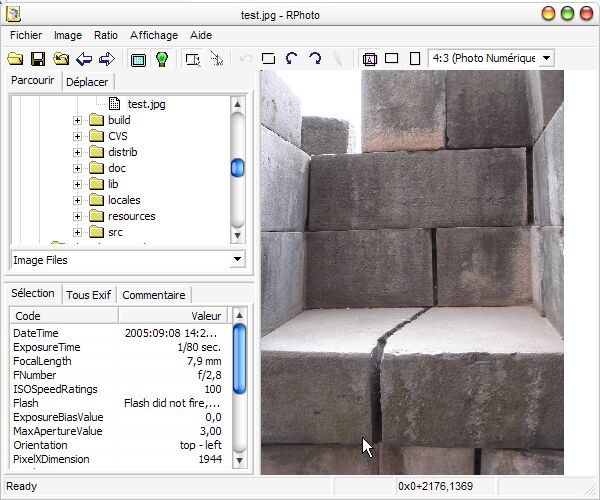
Main Panel
The application is built on a main panel, which gives access to all features by menus, toolbars, or lateral tabs.
Some intersting points to be noted :
- You can change the space allowed for tabs by drag'n drop on the separation line.
- In order to not interfer with input boxes, shortcuts are only available in the image field. If they don't work, a simple clic on the picture screen will correct that.
- In crop mode, the selection is a rectangle that respects the choosen ratio (4:3, 24:36,...) and the prefered orientation (portrait, landscape, auto). In the auto mode, the selection tool will catch the orientation that is closer to your mouse pointer.
- In inclinaison mode, the selection tool is a simple segment. Just draw a line, and the software will detect automatically if it should be a horizontal line or vertical line. If this does not fit you, just rotate again the picture with the 90° left / right buttons..
- To move the selection, you just have to drag'n drop the center of the rectangle or segment. You can also move with the keyboard arrows (while pressing Ctrl if you wish to move faster).
- To modify the selection, drag'n drop one of the handles (black squares), or use arrows keys while pressing Shift. A simple clic outside the selection will remove the current selection.
- You can switch with the "Full screen" toolbar button between "Full screen" or "No adjustment" to adjust your selection pixel by pixel.
Tab "Browse"
- A simple clic on a file will open it in RPhoto (and therefore, close the one you were working on).
- Are only presents in this tree the files matching the selected type in the dropdown below the tree ("Image files" by default). In case the file you want does not appear, select "All files (*.*)".
- To rename the file, clic a second time on its name. To rename a folder, do three separate clics on its name. You cannot change the name of the folders containing the file currently viewed.
- "Previous" and "Next" apply relative to the order shown in the tree : Next will select the file displayed next the current file in the tree.
- You can also drag and drop a file from explorer to open it in RPhoto, or put RPhoto in you "Send To" folder.
Tab "Move To"
To move a file, select in the "Move To" tab the target folder, and press "Move Here", or use the shortcut "m" (move). You do not need to re-select the folder each time, nor to have the tab "Move To" activated to use the keyboard shortcut.
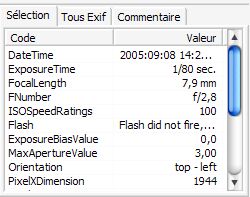
Tab "EXIF" (JPEG)
These two tabs display Exif tags if present in the file. These tags are not editable.
The first tab lists only those who you have chosen to (see Settings section), whereas the second lists all tags.
Proprietary tags are not always displayed correctly, and the thumbnail is not shown. Exif tags are not modified by RPhoto : neither size, nor thumbnail will reflect changes made in RPhoto (so you will keep a trace of the original picture).
Tab "Comment" (JPEG)
This tab shows the comment of a JPEG picture, if any, and allows the user to change it.
To change the comment, type the wished text, and click on "Apply". As long as the text is red, the comment will not be saved. When applied, the comment will be displayed in black, but will be permanently recorded only when the file will be saved.
Statusbar
The status bar gives you some information about the current statuts of the application.
The first section shows you the last message, or a short description of the button or menu pointed. The third tells about the selection : size and position of the rectangle (WxH+x,y) or angle of the segment, in degrees. Other sections are not currently used.
The mouse pointer is also a good indicator to know if the application is ready or busy.
Toolbar
 : open a file with a selection dialog box.
 : save the current file (replace the current file).
 : re-open the file as it was when last saved
 : go to the previous file in the current folder.
 : go to the next file in the current folder.
 : toggle the fullscreen mode ; in this mode, the picture is reduced to fit in the window ; it does not affect its quality nor its definition.
 /
/  : toggle the JPEG lossless mode ; if the light is red, it is impossible to use this mode (non-JPEG file, or an operation incompatible with lossless has been done, as a inclinaison correction)
 /
/  : select the current mode : crop / inclinaison. A second press of this button will do the default operation.
 : undo the previous operation, limited to the maximum number provided in the settings ; while no other operation has been done, you can cancel the undo by using Edit / Redo.
 : crop the picture with the current selection rectangle (JPEG lossless is possible).
 : rotate the picture of 90 degrees to the left (JPEG lossless is possible).
 : rotate the picture of 90 degrees to the right (JPEG lossless is possible).
 : rotate the image of a few degrees ; you must be in inclinaison mode.
 /
/  /
/  : select the wished shape : both / portrait / landscape.
 : select the wished ratio or size of the rectangle ; in addition to the one predefined, you can enter one yourself : for ratios, use format x:y (ex : 4:3) or for fixed sizes, use format WxH (ex : 320x200).
Settings
This screen allows you to modify every single settings.
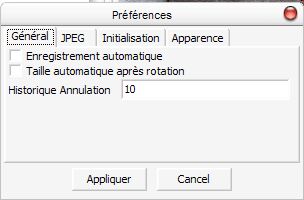
- General / Autosave : save automatically before opening a new file. Very efficient, but to use with care.
- General / Auto Crop before saving : execute the current action (crop, rotation) before saving the file (to be use with caution).
- General / Auto Crop after rotation: crop automatically the picture after a rotation, with the most appropriate selection. If not set, select the most appropriate rectangle, but let the user to choose to crop or not.
- General / Undo history : maximum number of undoable operations.
- JPEG / JPEGTran Path : jpegtran is the tool used for lossless operations. It is bundled with windows binaries, you should not have to modify this setting.
- JPEG / JHead Path : jhead is the tool used to rotate image according to Exif tag. It is bundled with windows binaries, you should not have to modify this setting.
- JPEG / Auto Rotate on load : in case of a specific orientation given in Exif tags, this will rotate automatically the image according to this tag, and reset the Exif tag. Need jhead installed.
- JPEG / JPEGTran Alerts : some lossless operations cannot be done without the loss of 8 pixels blocs. In most of the cases, you should ignore these messages, as they won't affect visibly the picture ; they will appear in the statusbar.
- JPEG / JPEG Quality : quality used to save JPEG file when the lossless mode is not used ; a classic value for a good camera is 98 ; you can estimate this value with the menu Image / JPEG / Detect Quality
- JPEG / Exif Favorites : Exif tags are often numerous and without any order ; this setting allows you to select the one you want to see in the Favorites Exif tab (semi-colon ";" separated-list).
- Startup / Default Path : open this path at startup.
- Startup / Remember Last Opened Path : update default path with the path of the last image opened.
- Startup / Ratio & Orientation : set the ratio and kind of rectangle to use at application startup
- Startup / Ratio's list : list of values in the dropdown list of ratios (format : "x:y (Comment)", separated by "|")
- Startup / Guides ratio : you can have two horizontal and vertical guide lines ; you can select a proposition value in the dropdown list, or type another value (format : "0.xx (Comment)") ; 0 means no guides
- Startup / Resize list : list or size that will be shown in the resize dropdown list (format : "XXXxYYY (Comment)", separated by "|")
- Display / Fullscreen : default value for fullscreen.
License, Updates, Support
This software is distributed under GPL license ; it basically means that its use is free and its source code is available in order to allow you to improve it (see GPL license for conditions).
Home location of this software is : http://people.via.ecp.fr/~remi/soft/rphoto/rphoto_en.php3. RPhoto is also available on Freshmeat and Sourceforge. You will find there documentation, updates and contact information.